You can translate Collections in the CTE Translation view.
Note: The keyboard shortcuts displayed in the illustrations and in the text are the default hotkeys. You can customize and set those as per your choice as described in detail in the Translating topic. As a general rule, in MacOS the Cmd/Command key in Apple Keyboards is used instead of the Windows keyboard Control key. So, e.g., the Windows hotkey Ctrl+G is in MacOS (Apple keyboard) Cmd+G.
Translating with CTE contains the following steps:
Once a task is ready for you, you receive an email notification with information about the task including a direct link to the task in the Lionbridge Workflow (TMS). Click on Open Project Task View to go to the correct area in TMS to accept your task.
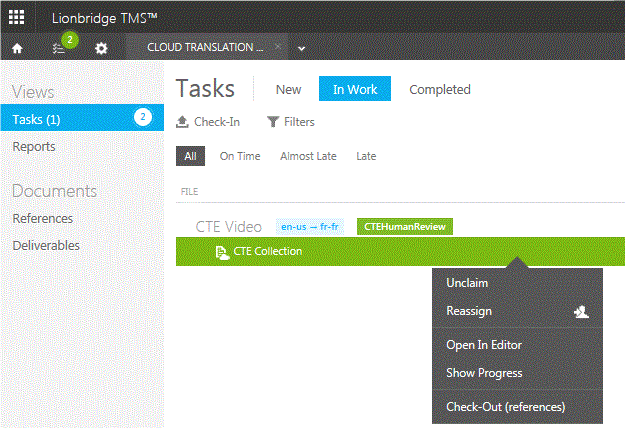
Once you have accepted, the task will appear on the “In Work” screen, where you can click on the Collection link to launch the CTE environment in a new browser tab.
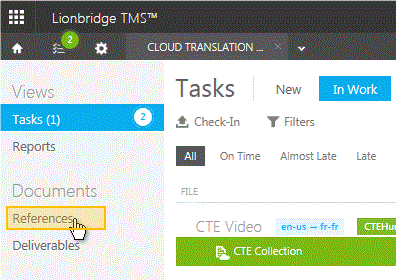
Before you accept a translation task, you can check the task’s References in TMS to view the source material and other references for the task.
Select Open in Editor from the drop-down menu to get started.
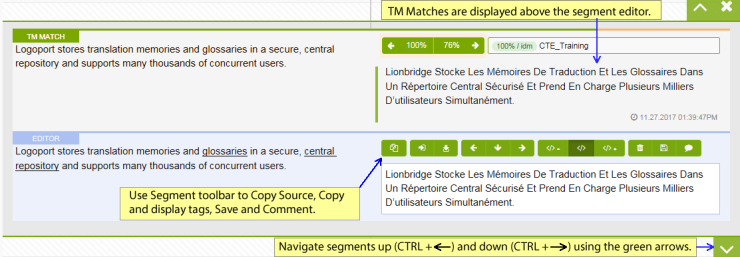
When CTE displays in your browser, you can see a translation setup with source and target alongside of each other, as displayed below:
![]()
You can navigate the segments by using keyboard shortcuts:
Note: The keyboard shortcuts displayed in the illustrations and in the text are the default hotkeys. You can customize and set those as per your choice as described in detail in the Translating topic. As a general rule, in MacOS the Cmd/Command key in Apple Keyboards is used instead of the Windows keyboard Control key. So, e.g., the Windows hotkey Control+G is in MacOS (Apple keyboard) Cmd+G.
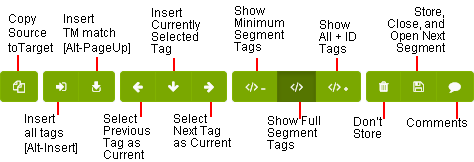
Segment Pane Toolbar includes commands you can use for editing the content of the open target segment.
The toolbar provides the following options:
|
Option |
Description |
|---|---|
|
|
Copy source to Target copies the content from the current source segment to the current target segment. |
|
|
Insert all tags [Alt+Insert] inserts all tags from the current source segment to the current target segment. |
|
|
Insert TM match [Alt+PageUp] inserts the current TM match translation to the current target segment. |
|
|
Select Previous Tag as Current sets the previous tag as the current tag, so that you can insert it with the Insert Currently Selected Tag command into the current target segment. |
|
|
Insert Currently Selected Tag inserts the selected tag from the current source segment to the current target segment. Note: When the Combine Consecutive Tags option is enabled, if you select Insert Currently Selected Tag the tag and its consecutive tags in the source segment are inserted to the target segment simultaneously. |
|
|
Select Next Tag as Current sets the next tag as the current tag, so that you can insert it with the Insert Currently Selected Tag command into the current target segment. |
|
|
Show Minimum Segment Tags displays the tags inside the segment as minimized, numbered tag indicators. |
|
|
Show Full Segment Tags displays the tags inside the segment as full tags. |
|
|
Show All + ID Tags displays the tags inside the segments as full tags and also displays the ID numbers of the tags. |
|
|
Don't Store closes the segment with all the changes made while it was open, but does not store the into the TM. |
You can open a segment for translation by double-clicking the source segment. The open segment is displayed in the Segment Pane inside the Translation view, with the target segment field.
You can edit the segment matches you get from the TMs by making changes to the target field texts. When the TMs do not provide translation suggestions, you can fill the target field manually.
When you open an untranslated target segment is auto-filled with the best available TM match.
Note: When more than one match with identical match value exist in the TM, CTE provides first the match with the latest time stamp.
Note: A target field of an untranslated segment is not auto-filled when the best available TM match is a machine translation. A user can still manually insert an MT match in the target field by selecting Insert TM Match or pressing Alt+PgUp.
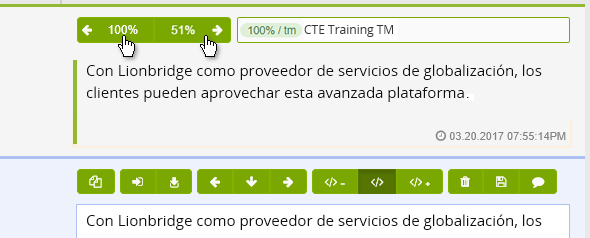
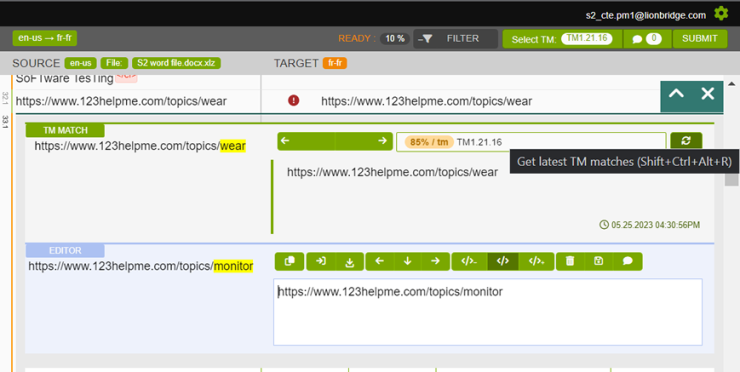
You can browse the matches provided by the linked TMs by using the buttons at the upper part of the Segment Pane.
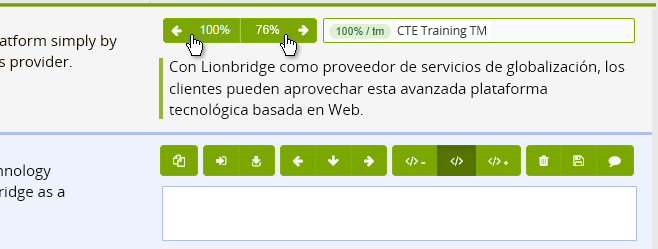
You can also browse back to the previous TM match.
You can navigate the matches from the TM also with keyboard shortcuts:
Browsing the matches updates the match percent values in the buttons and in the match TM field.
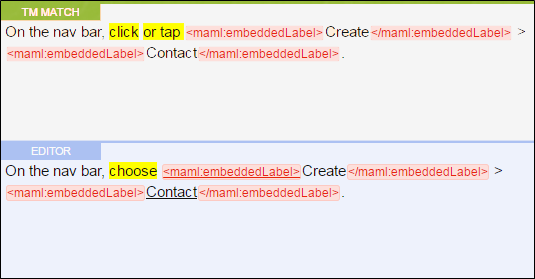
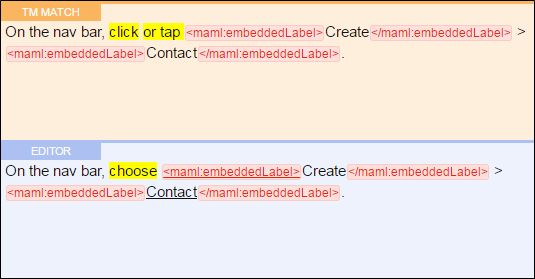
TM match differences are highlighted in the segment editor. Terms that have Terminology search results are underlined in the segment editor. Underlined <tags> indicate which tag is currently selected for copying from the source segment into the target segment.
Clicking on a green button triggers a command —– a tooltip appears if you hover over a button explaining its function and telling which keyboard shortcut triggers them.
Note: Translations saved in the immediately preceding segments are not always automatically available. In such cases you can load saved TM matches by clicking Get latest TM matches button or using the keyboard shortcut [Shift+Ctrl+Alt+R].
Terminology and Concordance search windows are docked in the right-side panel. Glossary suggestions are displayed when you open a segment containing glossary terms.
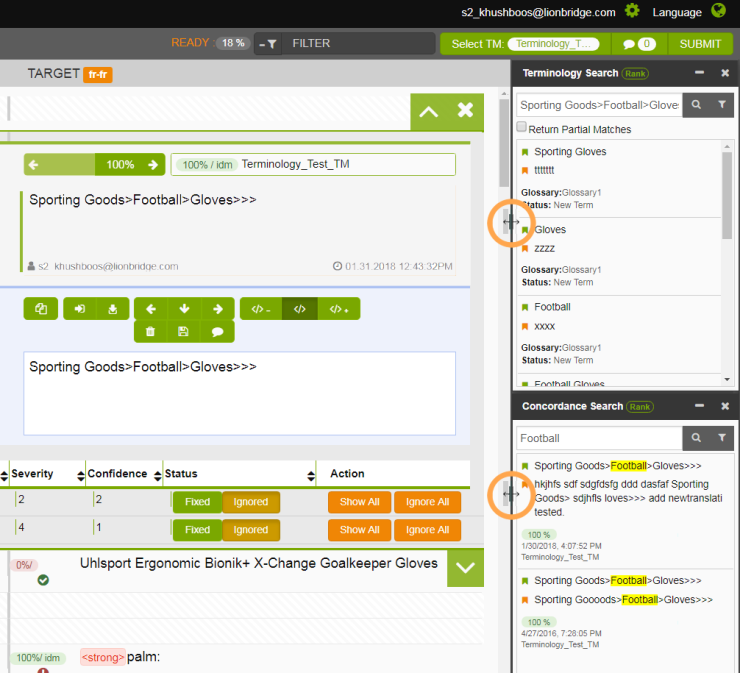
You can adjust the width of the Terminology and Concordance window by dragging the window's left side. (View the orange circles in the screen capture above.)
You can use existing hotkeys to launch and use Terminology and Concordance search
If comments exist for a segment they are displayed in the right pane when a segment is opened. You can find more information on comments in the Comments topic.
For projects with Geofluent Post-Editing, the Geofluent suggestions will pop up as TM matches which you can implement into the editor the same way you would with a match from the TM:

Please refer to the Geofluent Guidelines for more information on best practices for MT Post-Editing.
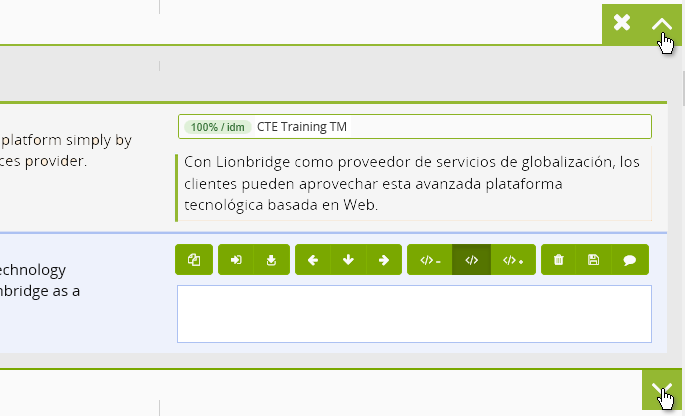
While you translate all the segments in the collection, you can move to the next segment and browse back to the previous segment in the collection by using the arrowhead buttons above and below the Segment Editor.
Note: You can save target segments with blank data which can be any combination of one or more whitespace characters including plain space, non-breaking space, tab, newline, etc. A QA Check WhiteSpaceError warning is displayed while saving target segments with blank data. Completely empty segments are not saved.
Clicking a segment opens it in a segment view in which you can edit the segment matches you get from the TMs by making changes to the target field texts. When the TMs do not provide translation suggestions, you can fill the target field manually.
You can move to the next segment and browse back to the previous segment in the Collection by using the arrowhead buttons above and below the Segment Editor.
TM match differences are highlighted in the segment editor. Terms that have Terminology search results are underlined in the segment editor. Underlined <tags> indicate which tag is currently selected for copying from the source segment into the target segment.
Note: When you perform a Find and Replace, the translation memory is automatically updated and you do not need to review and submit the segments individually. You can find more information on Find and Replace in the Finding and Replacing Content topic.
 With the Tools commands you can run the QA Check [F8] for the collection, open the QA Check Configuration dialog [Alt+F9], and run Statistics for the collection.
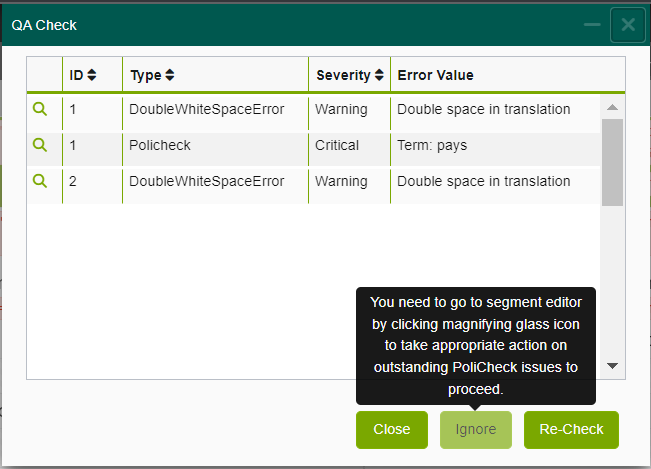
In the Tools menu on the left side, you can access a list of QA Checks.
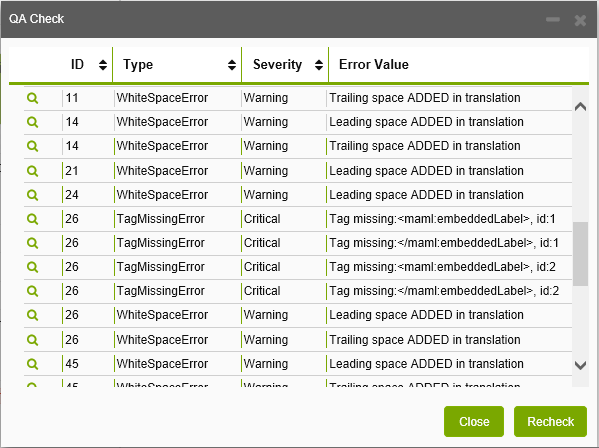
By running the QA Check [F8] you can get information on the possible errors included in the translations.
Note: When any outstanding PoliCheck QA issue exists in the collection, the Ignore button on the collector level QA issue displays a tooltip for taking appropriate action by clicking the magnifying glass icon and proceed in the segment editor.
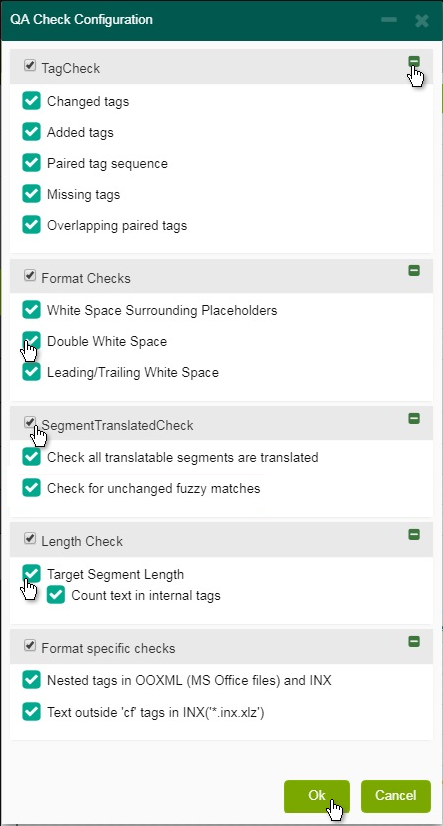
In the QA Check Configuration dialog [Alt+F9] you can set which checks are run during the QA Check. You can find more information on configuring the QA Check in the Translating topic.
In the QA Check Configuration you can configure checks based on specific project requirements:
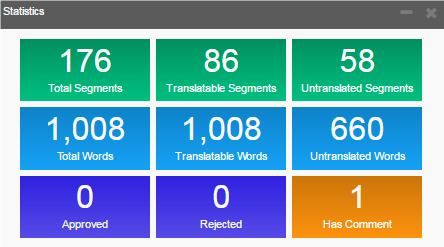
The Statistics [Alt+F10] functionality provides information regarding the status of segments in this collection:
With the Tools commands you can start running the Linguistic Toolbox (LTB) check for the collection.
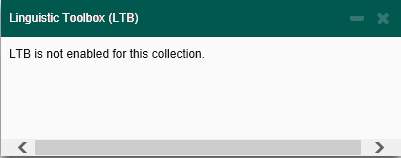
The Linguistic Toolbox check can be run only when LTB is enabled for the current collection. In such cases, when you select Linguistic Toolbox (LTB) in the Tools menu on the left, the Linguistic Toolbox (LTB) dialog is displayed, and the Run LTB button is disabled.
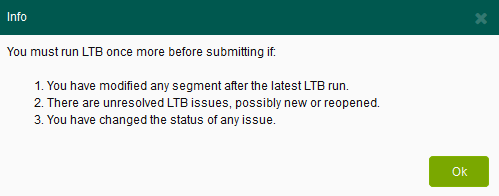
If a Project Administrator has enabled in TMS the Force LTB Check option for the CTE collection, you must run LTB and have it completed with zero unmarked issues immediately before submitting the collection (no segment or issue changes can be made in between). If you try to submit a collection without having just run LTB, even if there are zero unmarked issues, an error is displayed and you are told to re-run LTB before you submit. If this setting is not enabled for the collection (it is disabled by default), you are free to submit your collection at any time. You should, however, try to mark each issue with a status.
With the Tools commands you can start running the Linguistic Toolbox (LTB) check for the collection.
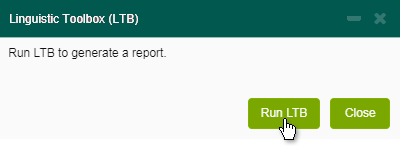
When LTB is enabled for the collection, click the Run LTB button to start the LTB check. Linguistic Toolbox creates a report on the current collection, which CTE loads to TMS when the collection is completed.
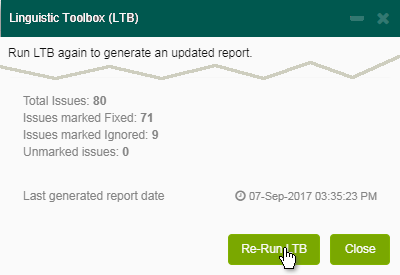
When the report has been generated, you can filter the results by using the selectors in the Linguistic Toolbox (LTB) dialog. You can filter the viewable segments based on the Category of the issues, their Severity level, and the Confidence for the issue being true. The dialog also displays statistics for the total number of issues, and the number of issues in each state, as well as the date and time of the last LTB run. You can close this window and return to it at any time to use the filters, view the statistics, or rerun LTB to generate an updated report.
|
|
Category = Text identifying the type of match found, for example: A - Incorrect Meaning |
|
Severity = Numerical value indicating the degree of severity for a given issue. The higher the number, the more severe the issue is. |
|
|
Confidence = Numerical value indicating the degree of confidence for a given issue, Higher number indicates more confidence. |
Status = Value indicating the status of the segment. |
When the LTB window is displayed, the main CTE filter changes to “LTB Filter”. When you select this filter, the LTB filters in the LTB window are enabled, and only segments with LTB issues are displayed. If you want to view all segments including those without any LTB issues, you can change the main CTE filter back to “None”.
When the LTB window is displayed, the main CTE filter changes to “LTB Filter”. When you select this filter, the LTB filters in the LTB window are enabled, and only segments with LTB issues are displayed. If the user wants to view all segments including those without any LTB issues, they can change the main CTE filter back to “None”.

The collection is now filtered to display the segments with LTB issues. In the Segment information, you will be able to see if all the LTB issues of that segment have been resolved (green check mark) or there are still open ones (red exclamation mark).
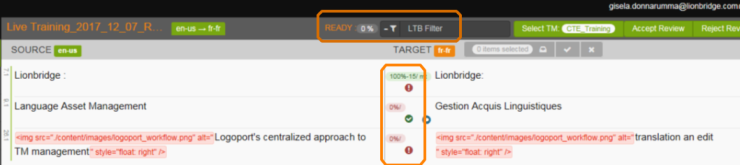
Segments with at least one LTB issue have a red exclamation mark icon in the collection view.

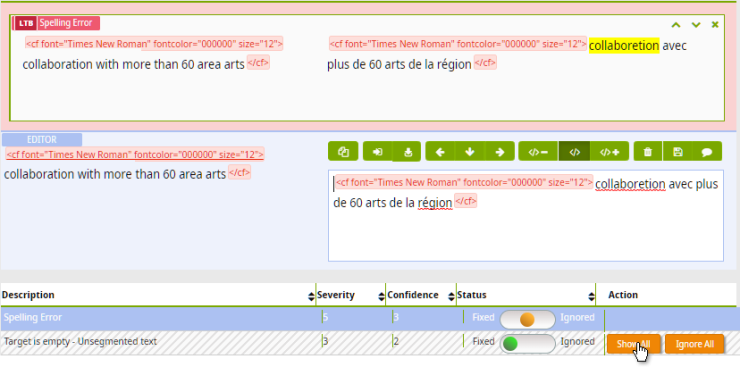
If you open a segment with LTB issues, the issues are listed below the segment editor. There you can view the description, confidence, severity, and status of each issue on this segment. (Hover over a truncated description to display the whole description.) The Confidence and Severity columns match the confidence and severity filters in the LTB window.
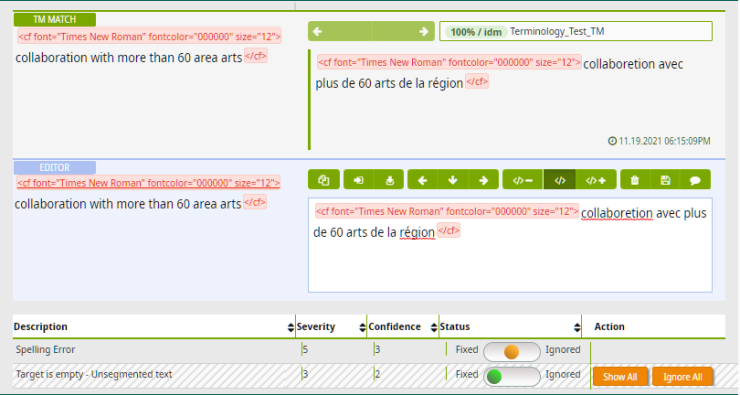
Click on an individual issue to display it in the top half of the segment editor, with available highlighting. This is useful to view where LTB thinks the error occurs.
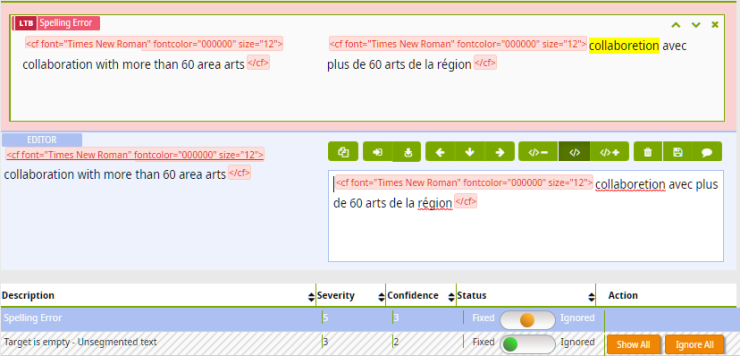
You need to give it a status for each LTB issue. If you fix the issue, you should select Fixed. If the issue is a false positive, you should select Ignored. You must save the segment for any issue status changes to persist. Changes in issue statuses are reflected in the statistics in the LTB window.

Some issues may have Show All and Ignore All action buttons in the issue list. This indicates that LTB has found identical issues on other segments in the collection. Show All is used to view these issues together. Selecting Ignore All sets these issues that don’t currently have a status to Ignored.
If a collection is created from one full HTML, DOCX, PPTX, IDML (InDesign), or TXT file, you can preview it using the Preview menu options Show Source Preview [Alt+S] and Show Target Preview [Alt+T]. Source and target content preview are rendered in separate browser windows you can move to any location on screen for convenient comparison of content. You can refresh the target preview to reflect recent changes by selecting Refresh Target Preview [Shift+Alt+T] in the Preview menu.
Note: You cannot use the Preview functionality if any of the following conditions is true:
1) The collection is not based on one full HTML, DOCX, PPTX, IDML (InDesign), or TXT file.
2) The collection is copy-protected.
3) The collection is configured to disallow previews.
4) The collection is not assigned to a TM.
At any time, the user can choose to re-run LTB, which will update the issues to reflect their status. Ignored issues will still be marked Ignored.
The correct configuration will automatically be loaded for you. Once the process is complete, you can see the LTB Report window.
The LTB screen shows the total amount of issues found by LTB and how to filter them by category, severity, confidence and status. The goal is to mark all the issues as either fixed or ignored before submitting the collection.
Fixed issues will only be marked Fixed if they are no longer found by LTB. If an issue marked Fixed is still present, it becomes unmarked when you re-run LTB. Any new issues that are found will be unmarked. When the re-run is complete, the statistics will be updated to reflect the new state.
If you try to submit a collection without having just run LTB, even if there are 0 unmarked issues, an error is displayed and you are told to re-run LTB before you submit. If this setting is not enabled for the collection (it is disabled by default), you are free to submit your collection at any time. You should, however, try to mark each issue with a status.
When all issues on a segment have a status, the icon in the collection view changes to a green check mark.
Note: Submit your work only after you have fully completed it. After submitting the collection, you cannot access it anymore. If you want to take a pause and continue later, just close the browser without submitting the collection.
When you are done and consider your translation as ready to deliver, click Submit at the top right corner of the view. This submits the task as completed to TMS. You can then logout from the CTE.
For information on handling tags see the Handling Tags topic.
For information on filtering the segments see the Filtering Segments topic.
For information on term search see the Term Search topic.
For information on Concordance Search see the Concordance Search topic.
For information on inserting special characters see the Inserting Characters topic.
For information on running a Quality Assurance Check see the QA Check topic.
For information on running a Linguistic Toolbox Check see the Linguistic Toolbox Check topic.
For information on submitting the translations see the Submitting a Collection topic.


